This is a LOOOOOOONNNNNNNGGGG post, so you might want to bring some sort of sports drink if you start feeling depleted part way through.

So, I'm not cool enough (or well known) to be involved in all of those cool group shows they have at certain galleries in L.A. Well, recently there was a contest to enter a piece that could end up in the I AM 8- BIT show. I figured that this might be a fun thing to do. It also helped that as soon as I read about it, I had an idea for a painting immediately. That almost NEVER happens.
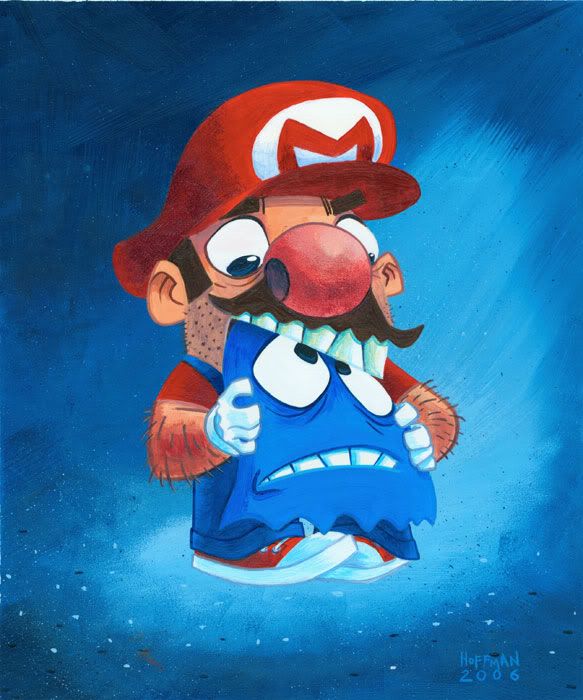
The painting above is what I submitted. It is called Crossed Wires; hopefully the title makes sense since it's Mario eating a ghost from Pac-Man. It is acrylic on illustration board (cold press) and the size is 8 ½” x 10 ¼”.
Early on in the process I contemplated doing a step by step with photos for the ol’ blog. I thought it might be interesting to get how I’m approaching painting lately down on paper, but then I thought better of it. Painting, although VERY relaxing I find requires a massive amount of thought, focus, and concentration on my behalf and I feared that if I kept breaking to snap photos, that I would break that and the thing would suck.
Instead, I’ll still verbally go through what I did to make this painting, there just won’t be a lot of pictures to go along with it.

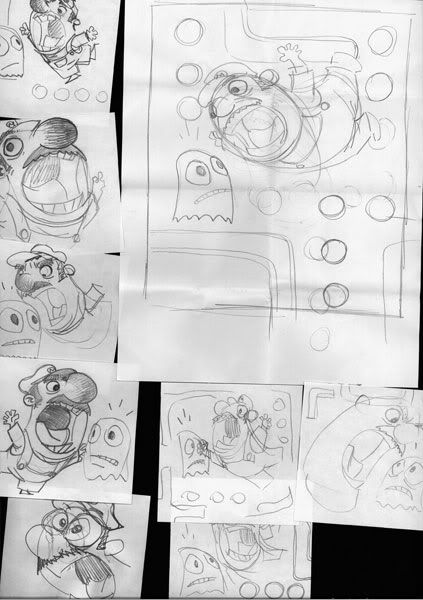
First, I threw down a bunch of different ideas. I have a block of Courtyard Marriott notepaper at work and whenever I had a free moment, or during lunch, I would try some sketches. Since I wanted to try my own take on Mario’s design, you can see that I was playing with that WHILE I was working on the composition. I don’t usually do this, but I thought I had a decent idea of where I wanted to go. As you can see, not really... The only thing you can see is that I knew I wanted Mario to be one overall shape, instead of a group of shapes pieced together. A slightly more graphic approach to design than I normally would do.
You might also see that I was trying to incorporate some design elements from the Pac-Man game board into the composition. Ultimately, I felt this was taking focus away from the simplicity of the image and composition I was trying to achieve so, I abandoned it for the bg you see in the final painting.

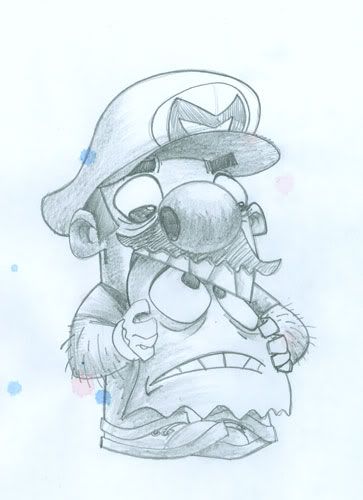
After all of this, I did the final sketch that you see above. I decided to simplify the action and made the pose a little more static than Mario pouncing on the ghost. I thought this communicated what’s going on MUCH clearer. I also like to throw down some quick tones and lighting, just to get an idea of how that will work in the final.
I then make a photocopy, cut my illustration board to the size I want (the board is bigger than the image in this one since I like to have a little boarder for the matte to lie over top if I decide to frame it. This way, I don’t lose any image when it’s framed.) I take the photocopy, place a piece of graphite transfer paper behind it, and use a metal scribe to transfer the drawing to the illustration board. Once that’s done, I clean up the board with my kneaded eraser (the board always picks up a little excess graphite) and then I do my last pass at the drawing, making any last minute fixes to the drawing. Too many times I have started a painting with a poorly conceived or executed drawing and had to scrap the painting because it sucks. I’ve found this method, although repetitive, gives me a certain amount of quality control.
I then take some frisket masking paper (a sticky clear film) and cover the drawing with it. I then cut off the excess, leaving only the drawing masked.
Now for the fun part, I just sit there and stare at the drawing. I find with painting I need to know EXACTLY what I’m going to do, before I do it so, I stare, for a long time. I go through every step of the painting in my head. I imagine how I will approach the background, then what colours I’ll use for the figures. What techniques will I use for certain areas? Sponge? Dry brush? Dead marmoset? Once I feel confident that I know exactly what it is I want to do, only then do I break out the paints. Sometimes this can take days, as I constantly think about it and problem solve in the back of my head while I do other things. It’s sort of like storyboarding for me, once I start, I can’t stop thinking about it.
This serves a duel purpose, it gives me the confidence of knowing exactly where I want to be but at the same time, allows me to deal with and appreciate the happy accidents that happen during painting. Since I know where I need to go next, I can know whether this splash here, or this weird brush stroke there will work with what I want to do. Most of the time, my favorite parts of paintings come form these little “accidents.”
So, now the paint hits the board. I mix all of my colours with acrylic matte medium to cut down on the glossiness of the paint. Sometimes acrylics can get a bit shiny and plastic looking, which I don’t like so, I like to make the paints a little more matte, closer to gouache. I just pour some on my palette and mix it with whatever colours I’m mixing. This also adds volume to the paint, so you use less paint in general. Although be warned, it does thin the paint a bit, making it more transparent so, use it with this in mind. Good for glazing.
The board is a bit wet, but not much water. I then put in some of the lighter background areas followed by getting darker and darker. While the paint is still wet I use a badger brush (blender brush) and soften some of the transitions while trying to keep some of the brushstrokes at the same time.
When that’s dry, I then use a sponge to help the transitions from light to dark as well as give the background some texture. After that I take a toothbrush and make some really dark and really light spatters again, to help with texture for the background.
After that’s dried, I then remove the frisket on the characters, and begin painting that. I paint both characters in flat, mid-tone colours. Flesh tone, his red shirt, blue pants, eyes, blue ghost etc.
Now I start adding the darker areas in shadow. Faking the light where I need to in order to help separate elements and make them “pop.” On Mario’s hat and on his nose, I used a sponge for the darks. I masked the surrounding area with removable tape and then just knock in some darks and some lights for the nose highlight as well.) This is a technique I ripped off of Bill Wray in his painting tutorial found in an issue of DRAW magazine. I thought it looked cool, and again, gives some nice texture to the painting. The rest of the shadow areas are done using paint thinned with a little more matte medium and in many cases, I tried to use more a dry brush technique. For his whisker area I pulled some of the paint off with a paper towel to try and give it a little different texture.
After that is all done, I then go in with a thin long brush and do all of the line work. This really pulls the final painting together. Some of the line work was done during the dry brush phase, just because I get impatient with waiting to see how things are going to look.
During the whole process, I have the orig. drawing right there, and I constantly reference back to it, making sure I’m staying on track. You can see this one got a little too close from the splashes of blue on the sketch.
Final little touch ups and I’m done. This would make more sense if I took pictures of the phases. Maybe when I get a little more confident with painting.
A lot of the time when painting, I’ll screw up early on and then fight the painting the rest of the way, trying to save it from the suck factory. Sometimes I succeed, sometimes I fail disastrously; this is the first painting I have ever done where that didn’t happen. I was happy with how each phase went. I definitely got lucky this time.

23 comments:
I freakin' love this painting, Monkeyfeather! And the step-by-step process is a treat.
Good luck!
It came out AB-so-lute-ly GORGEOUS. Congrats! Hope you don't mind, I added you to my links. You're an inspiration!
boy I haven't used frisket for a long time, I just
paint away, I've thought about getting some tho
Nice painting!
good luck with the show.
Sweet painting John...dig the sketches too!
Hey Clarke! Thanks. I was a huge loser in the competition, but the painting was fun to do, so who cares!?
Thanks Ven.
Hey z0mbi, thanks for stopping by. I like the work on your blog. Thanks for putting me into your links. I still need to get off of my @$$ and do mine.
Thanks Drazen.
Word Ber, word.
hi John... I love this one, the concept is great! I like to have it hanging on my wall!!
-heri
Thanks Heri.
John - Great painting and breakdown of your technique. I really dig the behind the scenes sktetches.
very cool..i truely admire those who are not afraid to try different media. painting has always been a HUGE fear of mine... and at the same time something I have ALWAYS wanted to do. someday i'll jump that hurdle. right now im caught in the digital relm.
very nice step by step. one things i always encourage is thumbnailing. its so valuable.
great work.
take care
Hey Ted, thanks. Rose and Isabel is lloking great! Can't wait to get a copy in my hands!
Thanks for dropping by Mike. Great drawings and designs on your blog.
Those mario sketches are great, you really pushed him. The last two posts make me want to pick up a brush again.
OMG, that is an awesome painting!!! I hope all goes we with 8-bit submission. That's really awesome of you to post the step by step process. I've always wanted to know your appoach on paintings. Extrememly helpful. I should just leave the office early...so I can paint! haha
i went tot the show tonight and while i must admit it was a sensational collection of work, that doesn't mean that your piece didn't BELONG there. it did.
the composition content and colors are all superb.
in fact it would have stuck out in my head as being among the best in the show.
but then as a couple days go by the crowded RAM of my brain will probably remember your pievce as being in the show after all. my memory does stupid stuff like that.
anyways, that gallery is too small to show all the work that was in that show anyways.
tonight it was crowded, very hot, and actually... it smelled a little like vomit in there.
i'm thorouhgly enjoying viewing your painting from my comfy new desk chair.
Hey Gerald, Thanks Man. You hitting the crawl this weekend?
Thanks MT! Pick 'em up! Would love to see some traditional media from you. Those girls in the tube have been SWEET!!!
Thanks Dano, very nice of you to say.
WICKED!! This is tooo COOL!
Woooowwwoowoww!!!!
I have just discovered this blog and I am amazed!!!!!
Is really amazing your art, men!!!
Congratulation!!! ;D
Hey just was looking at the new work very kool mario was real kool I was think about atari myself ealier might post something related to that well just thought I'd stop by and say hello again hope all has been welll take care!!
Thanks Alina. I like your latest post with the Monster cell phone. Good stuff.
Thanks Spundman. I like your avatar and the Jesus Quintana on your blog ROCKS!
Thanks Joseph.
Nice painting! You can never have too much Mario.(or Pac-man, for that matter)
i really dig your work man. kewl colours and inspirational art.
let's exchange links.
Monkeyfeather, this is sweet! Thanks for sharing your process. I've heard of using frisket before, and never tried it but will. It sounds like time saving device worth looking into!
That ghosts expression is hysterical, and Mario looks so depraved, & funny! Good luck with everything!
Oh my gosh I love this!! Seeing the process you went through was good fun, as well. Great stuff.
P.S. I found you through the drawing board :)
Post a Comment