Hey there,
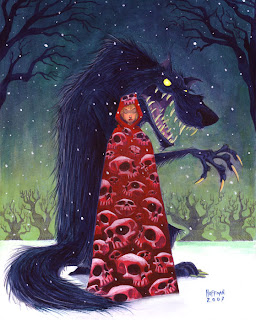
First off, HAPPY BIRTHDAY to my beautiful wife. Above is a painting I did for her birthday (July 8th.) She's the reason the skull motif has shown up in my last few paintings, but those paintings all ended up going to someone else so, I figured it was about time I did one for her.
As usual, the original idea was not the end idea with this painting. I was going to do something similar to the piece I did for the EMERGENCY Auction (except this would be acrylics, not watercolour) but she would be in a hooded cloak instead of a kimono. I did a quick thumbnail, thought, "That's it" and went right to the illustration board.
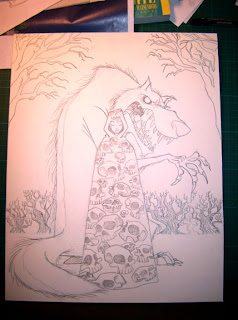
I should have done more exploration drawings before I went to the board. Red Riding Hood popped into my head, and I went with it. What followed was a lot of erasing and re-drawing since I had no idea what the design for the wolf should be. Eventually, I got something I was kind of happy with. Looking back, I wish I had spent more time (a lot more time) pushing the design of the wolf. Eventually, I ended up with this drawing...
Now in my previous skull paintings, lighting hasn't been much of an issue. I wanted to incorporate a little more light and shadow into this one so, I did an underpainting for this as my first step. As a side note, I decided to block in the shadows, light, etc. with Payne's Grey. The acrylics I use are the same bottles I bought when I was in college so, they're kind of old. I hadn't realized until now that my Payne's Grey is now BLUE! I know it is usually a cooler grey, but this stuff has aged into a nearly indigo blue. If you have some old Payne's lying around, you might want to check it. Luckily, I was going to do a painting with a cooler temperature colour scheme so it wasn't a total disaster. Good thing I wasn't going for a nice warm Coppola/Gordon WIllis feel...
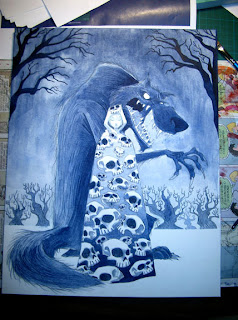
From here, I started to lay in some layers of colour in the sky. I wanted it to be a kind of night time snow scene, but I didn't want it to be the usual blue=night colour scheme, so I went with more of a green sky. With the lighter end of the sky near the horizon, I added some white to the green to lighten it more, and I did some thin washes of it over the trees to try and add a bit of a misty, atmospheric feel. It knocked back the trees how I hoped, but it wasn't entirely successful. I guess ideally, I could have used an airbrush, but I prefer not to.
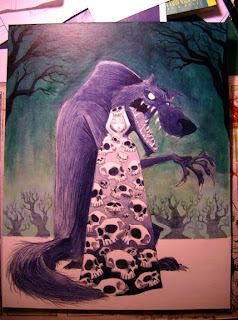
I thought the sky was looking a bit dull after the white incident so, to try and add some depth and translucency, I layered in some glazes of yellow and a yellowy-green. Happier with this, I move on to the wolf. Mainly, I darkened him as I wanted him to be pretty close to a silhouette yet, with elements of detail still visible within the overall shape. I added some rim lighting to help seperate him from the background a little more. I also did his teeth and claws as an off white. I intended to have his eyes white as well at this point.
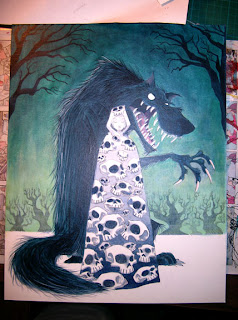
You can't see much of a difference in this one as I'm now at the point of miniscule adjustments. It was around this time that I started thinking yellower teeth, claws and eyes. Also, I thought that would help with the overall colour harmony. I kept trying to make the wolf darker as well at this point.
Around this time I apparently became really focussed on getting the painting working, and completed. In other words, I don't have any more pictures of the painting in progress. The last time I tried to do one of these photo tutorials, I never even finished the painting so, at least this was finished. Let's see if I can break down what I did next...
First I did what I was just talking about, I yellowed the eyes, as well as his claws and teeth.
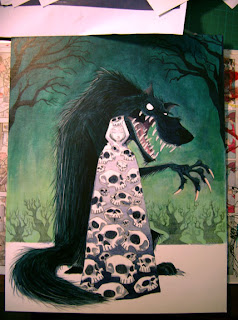
After that, it was on to the girl. I layered in an intense red colour near the top because I wanted her to pop. Painting around the skulls, I layered in red to the rest of her cloak. As I got toward the bottom I had to layer in some darker reds and purples. Even though the dark is there in the under painting, acrylics aren't 100% transparent so it tends to lessen the darks and lights moving them closer to a mid-tone at times. So, you have to go in and punch those up. The underpainting is more of a guide than anything else. It tells you what you want to do, or should remember to do.
After I was happy with that, I thinned some red down with matte medium and made a nice glaze that went over the entire cloak, skulls and all. Now the skulls were kind of a pinky red, and the whole cloak felt like a unified whole. I went back in and punched up more of the darks on the cloak and then went onto the skulls...
The skulls were unified to the cloak, but I still wanted them to pop like in the other paintings so, I thinned down some white with Matte Medium and went in and added highlights to the skulls, strengthening the overall lighting effect on them.
Once I was reasonably happy with the cloak, I moved on to her face, adding a thin layer of flesh tone and slowly building it up, hoping not to effect the shadows I had already layered in.
From there it's just adjusting and detailing until it gets to that point where I don't want to do any more in fear of screwing it up. I like to step away for a while now and come back with a fresher eye in hopes of finding some stuff to fix that I couldn't see before.
At this point, I went back in and worked on the snow around their feet and on the ground. I added some green to the snow in the back near the trees to help with the depth. I also tried to make it look like they were standing IN the snow and not ON the snow. I also added a bit of a shadow to help ground the characters.
After that, I added the last element, the falling snow. This was done in 2 passes if you will. The first pass was with kind of a light blue green for the snow in the background. I then did bigger white snow of varying size for the foreground. Doing two colours of snow is a good trick to add depth to falling snow so that it doesn't look like it's falling just in front of the characters.
That's pretty much it.